Instruction
Create a json blob file manually
To generate your own json blob file, you should start from an already configured object on a BIG-IP and read it out over REST to past the result on the new created empty file. It is important to understand, that you only can use single onjects as a result of the REST call. There are no lists allowed.
How to get REST content
It is recommanded to use a REST Browser like Postman to send REST calls towards the BIG-IP. On console also curl should be fine and since we are doing only GET requests here, also a normal browser will do.
If you are new to REST, you should start with the following call to get an index and start from there:
To get more background of the structure I would recommend the tmsh reference guide which you can download from https://support.f5.com. The REST API structure is mainly adapted from the tmsh structure.
Since v12 you can also browse on the BIG-IP directly over the REST API:
For example, if you would like to get the DNS setup of the BIG-IP follow the link sys followed by the link /mgmt/tm/sys/dns. To get the REST content you need now to click on Edit and Advanced:
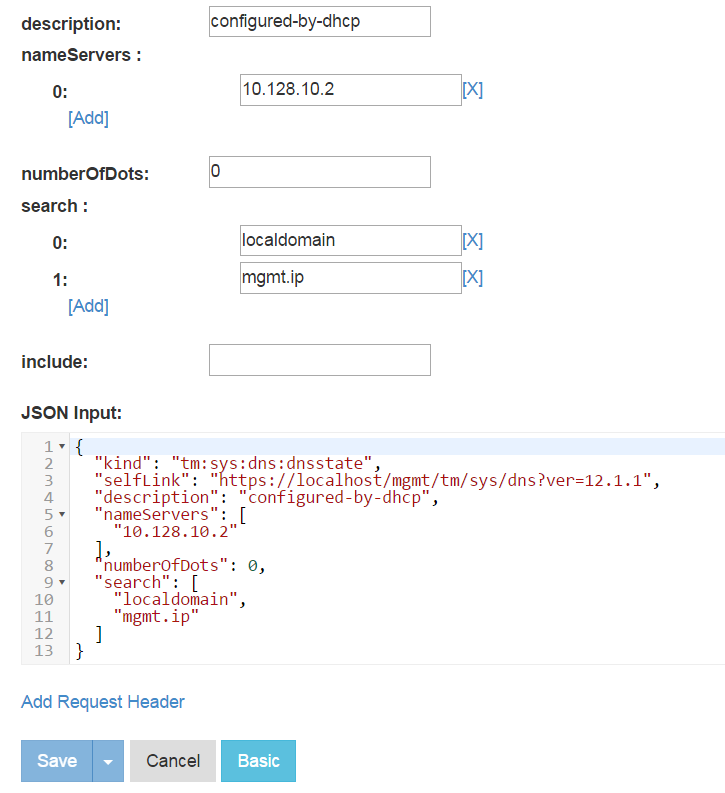
Now you can copy past the JSON code in the jb file.
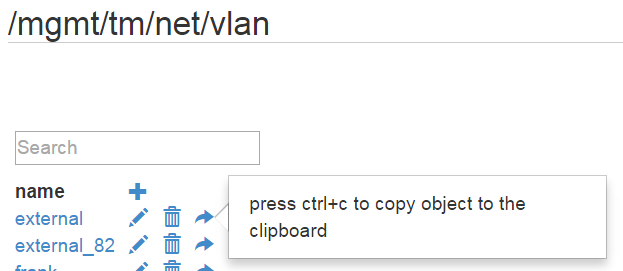
If you have some lists, you can also copy the JSON code towards the clipboard via the right arrow, as you can see on this vlan list.
Add the content to the json blob file
After you have been able to get the JSON configuration of the target objectt, you can copy past the JSON code into the json blob (jb) file.
If you would like to collect several objects in the same jb file, you simple can past them in but they need to be separated by an empty line. I choose an empty line as separates, since it is easy to parse and also it improves the readability of the jb file. As a result of this, it is not allowed to put any empty lines within the JSON object, even if it would be allowed by JSON.
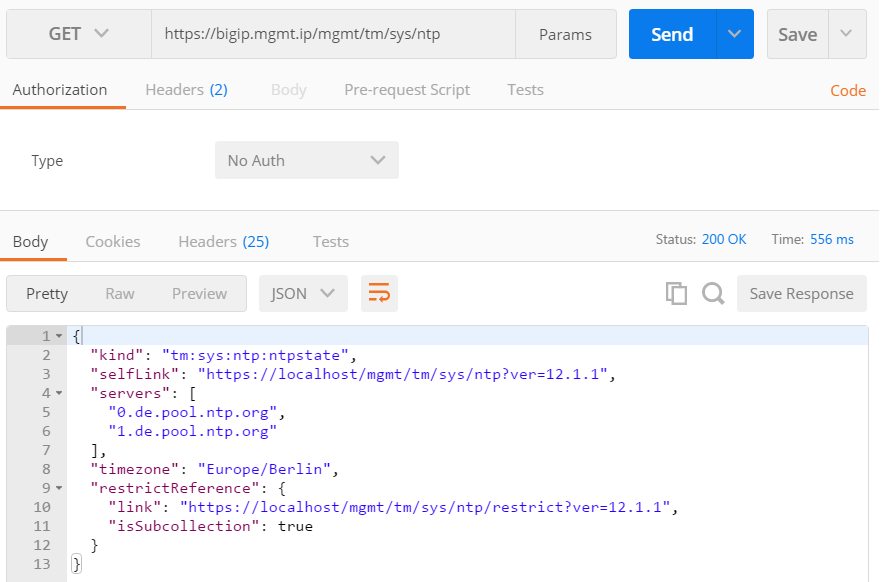
As an example we will add next the ntp setup of the BIG-IP. We simply take the configuration from the path /mgmt/tm/sys/ntp. And this time we will use postman for that:
How to change just some properties
So far we take one object and completely overwrite the configuration of the target system with it.
But sometimes we would like to change just one property of the object. Just imagen, you would like
to set the hostname of the BIG-IP, this can be done in the /mgmt/tm/sys/global-settings:
{
  "kind": "tm:sys:global-settings:global-settingsstate",
  "selfLink": "https://localhost/mgmt/tm/sys/global-settings?ver=12.1.1",
  "awsApiMaxConcurrency": 1,
  "consoleInactivityTimeout": 0,
  "customAddr": "none",
  "failsafeAction": "go-offline-restart-tm",
  "fileBlacklistPathPrefix": "{/shared/3dns/} {/shared/bin/} {/shared/core/} {/shared/datasync/} {/shared/em/} {/shared/GeoIP/} {/shared/images/} {/shared/lib/} {/shared/lib64/} {/shared/log/} {/shared/lost+found/} {/shared/mgmt/} {/shared/nfb/} {/shared/ssh/} {/shared/statsd/} {/shared/tmstat/} {/shared/vadc/} {/config/aaa/} {/config/big3d/} {/config/bigip/} {/config/filestore/} {/config/gtm/} {/config/httpd/} {/config/ntp.conf} {/config/rndc.key} {/config/ssh/} {/config/ssl/}",
  "fileBlacklistReadOnlyPathPrefix": "{/etc/shadow}",
  "fileLocalPathPrefix": "{/shared/} {/tmp/}",
  "fileWhitelistPathPrefix": "{/var/local/scf} {/tmp/} {/shared/} {/config/} {/usr/share/aws/}",
  "guiSecurityBanner": "enabled",
  "guiSecurityBannerText": "Welcome to the BIG-IP Configuration Utility.\n\nLog in with your username and password using the fields on the left.",
  "guiSetup": "disabled",
  "hostAddrMode": "management",
  "hostname": "bigip04.local",
  "lcdDisplay": "enabled",
  "ledLocator": "disabled",
  "mgmtDhcp": "disabled",
  "netReboot": "disabled",
  "passwordPrompt": "Password",
  "quietBoot": "enabled",
  "usernamePrompt": "Username"
}
As you can see we have several properties in this configuration we not want to touch. In this case remove all the properties from the list except the selfLink and the one ore two properties you would like to change. Don’t forget to remove the finishing comma at the last line!
{
  "selfLink": "https://localhost/mgmt/tm/sys/global-settings?ver=12.1.1",
  "hostname": "bigip04.local"
}
The selfLink is important to get the location of the target object and if there is only one or two additional properties in the object, the script will automatically change only this additional properties.
Next the object can be added to the jb file, as well separated by an empty line.
The above created jb file can be directly used to send it with sendjb.py towards the target device. In the next chapter we will talk about the jb-header which can give you further options.
The jb-header
The additional jb-header will give you further capabilities for the deployment. The basic header looks like this and should be positioned on the top of the jb file as well followed by an empty line. An empty jb-header would look like this:
{
    "kind": "jb-header"
}
Parameters
If you would like to create a jb file for some standard configurations where you need to do just some small adaptations in it, it would be great if you could use parameter on the top of the file to get the adaptions done instead of searching every time inside of the jb file.
For example, you created yourself an jb file to deploy a vlan together with an selfip to get this deployment send to different devices. Usually the vlan name, vlan Tag and the selfip is different for each deployment. For this case, you can directly create a list of parameters in the jb-header. In the property name you name the placeholder which will be replaced in the jb file by the property value of it. The name of the property can be freely designed but should be unique in the jb file. Here is an example:
{
    "kind": "jb-header",
    "parameters": {
        "<<vlanName>>": "VLAN22",
        "<<vlanTag>>": "22",
        "<<selfip>>": "172.29.22.61/24"
    }
}

{
  "kind": "tm:net:vlan:vlanstate",
  "name": "<<vlanName>>",
  "fullPath": "/Common/external",
  "selfLink": "https://localhost/mgmt/tm/net/vlan/~Common~external?ver=12.1.1",
  "autoLasthop": "default",
  "cmpHash": "default",
  "dagRoundRobin": "disabled",
  "dagTunnel": "outer",
  "failsafe": "disabled",
  "failsafeAction": "failover-restart-tm",
  "failsafeTimeout": 90,
  "ifIndex": 160,
  "learning": "enable-forward",
  "mtu": 1500,
  "sflow": {
    "pollInterval": 0,
    "pollIntervalGlobal": "yes",
    "samplingRate": 0,
    "samplingRateGlobal": "yes"
  },
  "sourceChecking": "disabled",
  "tag": <<vlanTag>>,
  "interfacesReference": {
    "link": "https://localhost/mgmt/tm/net/vlan/~Common~external/interfaces?ver=12.1.1",
    "isSubcollection": true
  }
}

{
  "kind": "tm:net:self:selfstate",
  "name": "<<selfip>>",
  "fullPath": "/Common/ext_self_128",
  "selfLink": "https://localhost/mgmt/tm/net/self/~Common~ext_self_128?ver=12.1.1",
  "address": "<<selfip>>",
  "addressSource": "from-user",
  "floating": "disabled",
  "inheritedTrafficGroup": "false",
  "trafficGroup": "/Common/traffic-group-local-only",
  "trafficGroupReference": {
    "link": "https://localhost/mgmt/tm/cm/traffic-group/~Common~traffic-group-local-only?ver=12.1.1"
  },
  "unit": 0,
  "vlan": "<<vlanName>>",
  "vlanReference": {
    "link": "https://localhost/mgmt/tm/net/vlan/~Common~external?ver=12.1.1"
  }
}
Transaction
Just imagen you have a list of objects like above, but much longer and on one of them an error happen.
Then you have the situation, that some of the objects are deployed and some not. This could cause some cleanup work.
In this situations it makes sense to get the deployment only done, if everything will go through well.
For this need, F5 introduced transactions, which can collect a set of objects which need to be deployed,
and will finalize it only, if the validation went successfully through.
To enable this feature you can add the transaction property in the jb-header and set it to true:
{
    "kind": "jb-header",
    "transaction": "true"
}
Be aware, that transaction do not accept the use of folders, which are created within the transaction itself. This will cause always an error and will never go through. Such folders are created, if you create a new partition or iApp. For more details, please have a look at the following section.
Partition
The configuration objects taken from you from the BIG-IP will be automatically deployed on the partition it was taken from. In the case you would like to change this, you can add the partition property to the jb-header:
{
    "kind": "jb-header",
    "partition": "Common"
}
All objects behind this jb-header will be deployed in the target partition. It is expected, that the partition already exist and will not be created automatically.
If you deploy a pool or a virtual which referred to an object, which is also deployed which in the range of this jb-header, the reference path will also be automatically adapted to the partition.
If you also would like to create the partition within this jb file, or you would like to use transaction for the deployment, you simply can create the partition on top of the jb-header, as you can see here:
{
  "kind": "tm:sys:folder:folderstate",
  "name": "myPartition",
  "subPath": "/",
  "fullPath": "/part5",
  "selfLink": "https://localhost/mgmt/tm/sys/folder/~myPartition?ver=12.1.1",
  "deviceGroup": "none",
  "hidden": "false",
  "inheritedDevicegroup": "true",
  "inheritedTrafficGroup": "true",
  "noRefCheck": "false",
  "trafficGroup": "/Common/traffic-group-1",
  "trafficGroupReference": {
    "link": "https://localhost/mgmt/tm/cm/traffic-group/~Common~traffic-group-1?ver=12.1.1"
  }
}

{
    "kind": "jb-header",
    "parameters": {
        "<<vlanName>>": "VLAN22",
        "<<vlanTag>>": "22",
        "<<selfip>>": "172.29.22.61/24"
    },
    "partition": "myPartition",
    "transaction": "true"
}

# Some more objects below . . .
Be aware, that all objects without the ‘fullPath’ property will ignore this Partition settings. The script assumes in this case, that the object will be a global setting and not something you can move in a partition. This also effects the case, that you put only up to two properties in the object beside the ‘selfLink’ to change only this properties at the target.
Application
I personally like to collect all belonging elements of one application together. A good way to do this is to create an iApp and create all related objects within this subfolder. This makes it easier to know, which objects are related to which application and also in case you need to remove the application from the system, it can be done by one click and all related objects are removed. The needed jb-header could look like this:
{
    "kind": "jb-header",
    "application": "myApp"
}
Like at partitions, the reference path in virtuals and pools to objects created below the same jb-header, will be adapted. Also it is possible to use the application option together with partition. But since the iApp will be created in the background, the application option can’t be used together with the transaction option. I also do not see any need for it. In case of an error, simply remove the iApp and start from scratch.
As described at the Partition section, also here we will ignore the Application setting, if the ‘fullPath’ property is missing in the object.
Host
With the host property, you can preset the target BIG-IP. This will overwrite the given host of the sendjb.py command. Over this you can create a jb file designed for a specific target. But mainly I introduced the host property, to be able to send within one jb file the same configuration to several BIG-IP’s. Please have a look at this examples for more details.
Preprocessor
The preprocessor will parse through the jb file, searching for some preprocessor commands and execute them, before any json parser will go through it. This gives you the ability to manipulate the file based on some simple ruleset before it get executed.
If ‘#’ is the first character in a line, the preprocessor will recognize this as a preprocessor command. At the next sections I will introduce all different available commands of the preprocessor.
Comment - ‘#’
A line will be recognized as a comment line, if it starts with ‘##’ or ‘# ‘. Also a line of the length of one with just the ‘#’ will be accepted as a comment line.
The preprocessor will simply remove this comment lines form the jb file.
Parameters on preprocessor level - ‘#define’
With ‘#define’ it is possible to create parameters, which are necessary for some other preprocessor commands. It can also be used as a parameter inside of the jb file. If the preprocessor finds after the definition of the parameter the <names> of the parameter in the code, it will replace it with the <value> of it:
#define <name> <value>
Spaces inside of the value will be used as a separator to create a list of elements. Therefore it is not possible to create any value entry with a space inside. Even if you use some quotations:
Definitions:
#define NO_LIST hello
#define NODE_LIST 10.10.10.1 10.10.10.2 10.10.10.3
#define LIST_WITH_QUOTES1 "This is a List!"
#define LIST_WITH_QUOTES2 "This" "is" "a" ""List"!"

Result:
NO_LIST = ['hello']
NODE_LIST = ['10.10.10.1', '10.10.10.2', '10.10.10.3']
LIST_WITH_QUOTES1 = ['"This', 'is', 'a', 'List!"']
LIST_WITH_QUOTES2 = ['"This"', '"is"', '"a"', '""List"!"']
As you can see, also one element will be internally managed as a list. Not that this should matter to you.
If the preprocessor spots a <name>, it will replace it with the first <value> in the related list. Except it will be used in a loop, then it follows the index of the loop.
Conditions - ‘#if, #elif, #else, #endif’
I not want to explain here how conditions work. I hope this is well known. After the ‘#if’ and ‘#elif’ is an expression expected. This can be anything which could be handled by python. If the expression is ‘True’ then the lines behind it will be kept in the final jb file. If it is ‘False’, then the lines will be skipped until the next, to this #if schemata related, preprocessor command. Nested conditions are possible.
If you would like to compare a string with some ‘#define’ definitions, make sure that the string is covered by quotes, otherwise python will recognize it as a variable which is not defined.:
Right:
        #define NODE_MODE "enabled"
        #if NODE_MODE == "enabled"
          <content>
        #endif
Wrong:
        #define NODE_MODE enabled
        #if NODE_MODE == enabled
          <content>
        #endif
Here is a list of possible comparison operator:
{ ==, !=, <, >, <=, >= }
Also the following boolean operator available:
{ and, or, not }
For more details I recommend to have a look at a python documentation.
Loops - ‘#loop, #lastloop, #endloop’
With loops it is possible to create the same json objects several times with some adaptions in it. The end of the loop is marked with ‘#loopend’. It is possible to cascade loops. It is necessary to create first via ‘#define’ a list of elements which will be the parameter of ‘#loop’. Over this list the loop will repeat the configuration. For the adaptation in the json object you place the <name> of the list inside the loop. At the end it works like a foreach implementation. Here is an example:
#define NODE_LIST 10.10.10.1 10.10.10.2 10.10.10.3
#loop NODE_LIST
{
        "exampleName": "example value",
        "address": "NODE_LIST"
}

#loopend
Make sure that you leave one empty line in front of the ‘#loopend’ otherwise you will miss the empty line to separate the json objects from each other. The result of the example above would be:
{
        "exampleName": "example value",
        "address": "10.10.10.1"
}

{
        "exampleName": "example value",
        "address": "10.10.10.2"
}

{
        "exampleName": "example value",
        "address": "10.10.10.3"
}
You can also use other list definition inside of the loop and it will follow the index of the loop list. If the list is shorter than the loop list, you will get a preprocessor error. If the list has just one element, only this one will be used.
With ‘#lastloop’ it is possible to catch the last iteration of a loop. This is helpful, if you would like to create a json property list, which is separated by comma. This means, the last line have to be created without any comma:
#define POOL_MEMBER_LIST 10.10.10.1:80 10.10.10.2:80 10.10.10.3:80
#
{
#loop POOL_MEMBER_LIST
  "poolMember": "POOL_MEMBER_LIST",
#lastloop
  "poolMember": "POOL_MEMBER_LIST"
}
#endloop
The Result would be:
{
  "poolMember": "10.10.10.1:80",
  "poolMember": "10.10.10.2:80",
  "poolMember": "10.10.10.3:80"
}
Include jb files - ‘#include’
With ‘#include’ another jb file can be loaded within a jb file. While it is possible to use ‘#include’ inside an ‘#if’ and ‘#loop’ construct and to use such construct inside of the included jb file, it isn’t possible to spread one ‘#if’ and ‘#loop’ construct over several jb files. I considered this as a bad design and I am not planning to include this capability.
Preprocessor debugging
In the case you got some issues with the preprocessor or simply would like to see the result of the preprocessor bevor sending it out, you can use the preprocessor.py script to get a look at the result:
$ python preprocessor.py <file.jb>
Create a json blob file automatically
With the python script getjb.py you can get json objects from a BIG-IP. Here you can see how to use it:
$ python getjb.py <username>@<bigip.mgmt.ip> <target jb file> <object path>
First you will get a prompt for the password of the given user. This has the advantage, that there will be no trace in the history of the command line regarding the password and also it is not necessary to store the password in the script itself.
Here is an example for an request you could create:
$ python getjb.py admin@bigip.mgmt.ip demo.jb /mgmt/tm/net/self/ext_self_128
Pasword for admin@bigip.mgmt.ip:
Collecting Objects:
/mgmt/tm/net/self/ext_self_128
This will simply store the json content of the selected selfip in the demo.jb file. This is something you probably could do more comfortable over postman or the toc of the BIG-IP. But the main advantage you will recognize, when you try to get one of the following objects, since it will also collect the related objects at the same time:
- pool: /mgmt/tm/ltm/pool/pool_name
- virtual: /mgmt/tm/ltm/virtual/virtual_name
- virtual-address: /mgmt/tm/ltm/virtual-address/ip-address
This will be covered in details in the next sections.
Pool
Beside the pool, the following sub-objects will be collected, if you request a pool instance of the BIG-IP:
- Monitors
- Pool Members
Default monitors will not be included in the jb file, since I assume, they will be also available on the target system.
Virtual
The virtual has far more sub-objects than a pool. Since there are no specific rules, how sub-objects are specified in the virtual, this need to be implemented in the script manually. Therefore, I just managed a subset of all objects which are listed here:
- Default Pool with its sub-objects
- iRules
- Profiles
- Policies
- Persistence with fallback persistence
- SnatPool
- RateClass
If some objects of the virtual are missing, feel free to add them manually to the jb file.
All default objects will be skipped as well.
Virtual-Address
In case you would like to migrate a virtual server to a different BIG-IP, you need to do this IP address wise. With this option, you can collect all virtual server using this specific IP address to transfer them towards the new target. Since I assume, that the target BIG-IP is connected towards the same vlans, arp will be disabled on the virtual-address object in the jb file. Therefore you can deploy the resulting jb file towards the new target and check, if everything works fine on the new deployment, before you disable arp on the source BIG-IP and enable it afterwards on the target BIG-IP. Now the migration is finalized.
In case you are using a snatPool, please make sure you change the IP addresses of it in the jb file, to avoid IP address conflicts.
In the case, some objects are used twice (like a pool from an http and https virtual), this objects are added to the jb file only once.